Regor's Goldwing Scrapbook
[ Home ] [
Search ] [ About Us
] [ Submit Pics/Docs/Suggestion ]
("Submit" Turned off due to hacking
- Sorry )
Pick from the list below to see an accessory on a Goldwing
↓
↓
Get your tips here
↓ ↓
WingIt
Links
Support your Small
Business Owner
↓ ↓
Vendors
Please Sign
↓ ↓
↓ ↓
Misc Pics
Need your own Web space
1000MB 50GB Web Hosting
for only $9.95/month with no
contracts. PHP4, MYSQL, CGI,
SSH all included.
Click here!
Tulsa Wind Wings Tips
Back to Tips
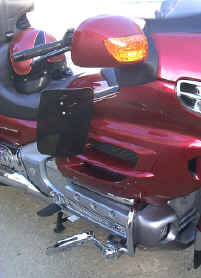
My passenger has complained about buffeting from the first ride. Step 1 was to order the Tulsa Windshield. That didn't seem to help, although I do like the looks of the Tulsa Windshield better than the stock. Step 2 was to order the Tulsa Wind Wings. The Wind Wings were effective in moving the wind off the passengers lower body; however, the find still hits the passenger (mine is 5'-0") in the upper chest and head. I can feel the wind on the top of my hands. There is a severe turbulence coming right below the mirrors. I can move my hand in the path of the wind and it tracks right to the passenger. I believe Tulsa is working on this issue. While the Wind Wings are an improvement they do not provide the solution to the passenger buffeting problem.
The Tulsa Wind Wings admittedly do not give you the air flow control in terms of directing wind onto the driver, etc. that you get from the Baker Wings. That is not my goal. I was comfortable in the summer. However, if I don't remove the passenger buffeting, I won't have a passenger. I don't like the boxy look of the Baker wings. I would prefer not to have Wind Wings, but if you are going to install them the Tulsa Wings are styling and look good when installed.
The best thing about the Tulsa Wind Wings is that no drilling is required and this might be the easy install you have ever performed.
|
|
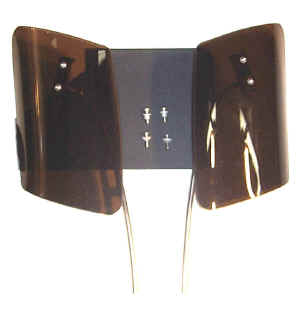
These Wind Wings are designed to offer the optimum air control, and will significantly reduce the wind noise in the intercom. This is accomplished by using aerodynamics instead of size to control the air flow from the fairing that is blowing into the co-rider's face. All Wind Wings have polished, stainless-steel mounting brackets and stainless-steel hardware (no rust or peeling), so you not only get the most efficient, but the Finest in Quality. Wind Wings are available in Smoke only. |
![]()
Wind Wings Part #S38010

Installation Instructions
Be prepared for a pleasant surprise. This installation might be the easiest that you ever do.
|
|
Parts List:
|
-
Place the motorcycle on the center stand. You really don't have to but this seems to be the first instruction in everything that you do on a Gold Wing.
-
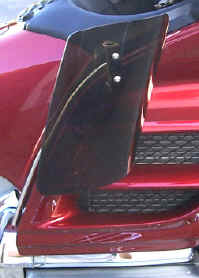
Remove the plastic trim piece that runs along the side of the left fairing, just to the outside of the fairing pocket, by gently lifting at the bottom of the trim piece. Remove trim on both sides. Left side shown.

-
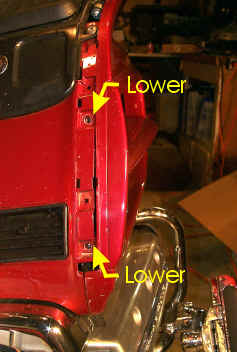
Remove the two lower Allen Screws (5 mm Allen Wrench).
-
The 6mm screw goes through the lower mounting tab and the 5 mm screw goes in the upper mounting tab. The long spacer fits on the 6mm screw below the mounting tab and the short spacer fits on the 5mm screw as shown in the picture below. Note: The nylon spacers must fit under the Wind Wing mounting tab with the washer end against the mounting tab. Insert the screws into the mounting holes and tighten with Phillip's screwdriver.
![]()
![]()
-
Replace the fairing trim.
-
Repeat for other side.
-
To adjust the Wind Wings grasp the Wing on top above the pivot bolt and turn Wing. Because the Wings do not loosen when they are turned it is possible to break the Wing if the pivot bolt is too tight.
-
The best position to take wind away form the passenger is to have the front edge of the Wing almost touching the fairing trim molding. It is NOT necessary for this design to close completely at the front, the shape of the Wing controls the air flow not the mass of the Wing.
-
Tulsa will send you a catalog with the order. In the catalog you will find a small sample of the auxiliary light armor. Cut two small strips of this clear armor and place on the fairing where the front edge of the Wing contacts the fairing. This will allow you to adjust the Wing as close as possible to the fairing without causing rubbing damage to the faring.